In Web3 applications connecting to a user's wallet is one of the most important aspects of the application, as it allows users to interact with the app, like signing transactions, getting profile data through the user's address, etc.
Connecting a wallet to a decentralized application is like logging into a traditional web2 application. Therefore, in building a web3 application this part is essential and If it isn't built well it can reduce the user's experience when using your application.
Using applications like Rainbow kit in your dapp does a wonderful job of connecting the user's wallet, it also has different connection options, but the code is abstracted away and developers sometimes don't know how to implement this functionality.
This is a tutorial for building a connect wallet application you can use in your web3 projects.
Building a connect wallet for your decentralized application.
To build this connect wallet application, these technologies are needed;
WAGMI: It is a collection of React Hooks containing everything you need to start working with Ethereum.
Tailwind CSS: It is a CSS framework that is used to rapidly build modern websites without ever leaving your HTML.
React-icons: This package is used to get icons to use in the interface of the application.
Headless-UI: This contains components that are completely unstyled, and fully accessible, which were designed to integrate beautifully with Tailwind CSS.
Ethers Js: It's a library that is used for interacting with the Ethereum Blockchain and its ecosystem.
The complete application can be found here along with the GitHub repo to this project.
The finished look of the application can be downloaded here.
Let's get started!!! 🚀🚀
Create a new project and open PowerShell/ terminal pointing to that location and run the following:
 npx create-next-app@latest connect-wallet-app
 cd connect-wallet-app

 npm install -D tailwindcss postcss autoprefixer
 npx tailwindcss init -p
 npm install @headlessui/react wagmi ethers react-icons

 code .
The above will install Next Js and other dependencies needed for this tutorial and then opens the project in your code editor.
For this tutorial, choose No for both the typescript and ESlint options, when creating the next app.
Configure your tailwind CSS installation, steps on this can be found in their docs.
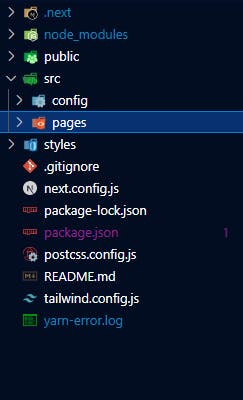
Create a new folder in the root of your project and rename it to src and move the pages folder into it. Then create a new sub-folder inside the src folder named config.
Your project tree should look similar to this 👇🏽
To start using wagmi in our application we need a client, therefore a need to configure it.
Inside the config subfolder create a file named wagmi.js and write this inside
 import { WalletConnectConnector } from "wagmi/connectors/walletConnect";
 import { MetaMaskConnector } from "wagmi/connectors/metaMask";
 import { chain, configureChains } from "wagmi";
 import { publicProvider } from "wagmi/providers/public";

 // using only 2 chains with WAGMI; ETH and Matic(Polygon)
 const chainArray = [chain.polygon, chain.mainnet];
 export const { chains, provider } = configureChains(chainArray, [
   publicProvider(),
 ]);

 export const connectors = [
   new MetaMaskConnector({ chains, options: { shimDisconnect: true } }),
   new WalletConnectConnector({
     chains,
     options: {
       qrcode: true,
     },
   }),
 ];
For this tutorial only Metamask and WalletConnect wallets are implemented, you can take this further to accept multiple wallets.
We need to wrap the page components in a wagmi client, this is done in the _app.js file found in the pages subfolder.
 import "../../styles/globals.css";
 import { createClient, WagmiConfig } from "wagmi";
 import { connectors, provider } from "../config/wagmi";

 export default function App({ Component, pageProps }) {
   const client = createClient({
     autoConnect: true,
     connectors: connectors,
     provider,
   });
   return (
     <WagmiConfig client={client}>
       <Component {...pageProps} />
     </WagmiConfig>
   );
 }
This ends the configuration needed to start building the main part of this application.
Running
yarn devornpm run devto start the application would still show the default Next js page gotten from the installation. Get rid of that code and put this part in 👇🏽(Part1)// All the needed imports for this application import Head from "next/head"; import { useState, useEffect, Fragment } from "react"; import { Listbox, Transition, Dialog } from "@headlessui/react"; import { RiArrowDownSLine } from "react-icons/ri"; import { useNetwork, useAccount, useConnect, useDisconnect } from "wagmi"; import { utils } from "ethers"; export default function Home() { //The necessary data needed to use the two chains const NETWORK_DATA = [ { id: 1, image: "/polygon.png", name: "Polygon", isActive: true, chainNoHex: 137, chainId: utils.hexValue(137), chainName: "Polygon Mainnet", nativeCurrency: { name: "MATIC", symbol: "MATIC", decimals: 18 }, rpcUrls: ["https://polygon-rpc.com/"], blockExplorerUrls: ["https://polygonscan.com"], }, { id: 2, image: "/eth.png", name: "Ethereum", isActive: false, chainId: utils.hexValue(1), chainNoHex: 1, chainName: "Ethereum Mainnet", nativeCurrency: { name: "Ether", symbol: "ETH", decimals: 18 }, rpcUrls: ["https://api.mycryptoapi.com/eth"], blockExplorerUrls: ["https://etherscan.io"], }, ]; // states used throughtout this project const [currentNetwork, setCurrentNetwork] = useState(NETWORK_DATA[0]); // this sets the network used const { chain } = useNetwork(); // this gets the chain the user connected to in the app const { isConnected: isUserConnected, address } = useAccount(); // get a boolean for the connection of a user and also their address const [isOpen, setIsOpen] = useState(false); const [walletDetailsOpen, setWalletDetails] = useState(false); const [switchOpen, setSwitchOpen] = useState(false); const { disconnect } = useDisconnect(); // this is function used to disconnect a user after connection ... }The images referred to in the code above can be gotten from here.
This next part of the code; shows the various functions used in the application like the switch network functionality, wallet details modal, etc.
 export default function Home() {
 ...
 // this checks if the user is connected to the right chain, if not then it opens a modal for you to switch to the right wallet.
 useEffect(() => {
     CheckNetwork();
   }, [isUserConnected, currentNetwork]);

   const CheckNetwork = () => {
     if (isUserConnected && chain?.id !== currentNetwork.chainNoHex) {
       console.log(chain?.id, currentNetwork.chainId);
       openSwitchOpen();
     }
   };

   function closeModal() {
     setIsOpen(false);
   }

   function openModal() {
     setIsOpen(true);
   }

   function closeWalletDetails() {
     setWalletDetails(false);
   }

   function openWalletDetails() {
     setWalletDetails(true);
   }

   function closeSwitchOpen() {
     setSwitchOpen(false);
   }

   function openSwitchOpen() {
     setSwitchOpen(true);
   }

 // Logout function
   const logout = () => {
     disconnect();
     closeWalletDetails();
   };

   const { connectors, connect } = useConnect({
     onSuccess() {
       closeModal();
     },
   });
   const getText = (text) => {
     if (text) {
       return "Wallet Details";
     }

     return "Connect Wallet";
   };

   //Switch Network Functionality
   const handleSwitchNetwork = async () => {
     const { chainId, chainName, rpcUrls } = currentNetwork;
     try {
       await window.ethereum?.request({
         method: "wallet_switchEthereumChain",
         params: [{ chainId }],
       });
       closeSwitchOpen();
     } catch (switchError) {
       const err = switchError;
       if (err.code === 4902) {
         try {
           await window.ethereum?.request({
             method: "wallet_addEthereumChain",
             params: [
               {
                 chainId,
                 chainName,
                 rpcUrls,
               },
             ],
           });
           closeSwitchOpen();
         } catch (addError) {
           return null;
         }
       }
     }
     return null;
   };
 ...
 }
All the above code so far shows the function, variables, and logic needed for the connect wallet application.
The handleSwitchNetwork function is called upon when the user isn't connected to the selected network and what this function does is get the current networks info (chainId, name, and rpcUrls) which is used to re-connect the user to that network.
Viewing the output of your project now won't show anything, since there is no frontend code written.
The frontend code is divided into two apects:
-> The Network dropdown and connect wallet button
-> The modals
The first part 👇🏽
 export default function Home() {
 ...
     <>
       <Head>
         <title>Connect Wallet App</title>
         <meta name="description" content="Connect wallet app" />
         <meta name="viewport" content="width=device-width, initial-scale=1" />
         <link rel="icon" href="/favicon.ico" />
       </Head>
       <div className="w-full">
         <div
           className={`w-full h-screen flex items-center text-center justify-center bg-orange-300 `}
         >
           <div className=" w-72 mr-6">
             <Listbox value={currentNetwork} onChange={setCurrentNetwork}>
               <div className="relative mt-1">
                 <Listbox.Button className="relative w-full cursor-default rounded-lg bg-white py-2 pl-3 pr-10 text-left shadow-md focus:outline-none focus-visible:border-indigo-500 focus-visible:ring-2 focus-visible:ring-white focus-visible:ring-opacity-75 focus-visible:ring-offset-2 focus-visible:ring-offset-orange-300 sm:text-sm">
                   <span className="flex items-center ">
                     {" "}
                     <img
                       src={currentNetwork.image}
                       alt={currentNetwork.name}
                       width="34px"
                     />
                     {currentNetwork.name}
                   </span>
                   <span className="pointer-events-none absolute inset-y-0 right-0 flex items-center pr-2">
                     <RiArrowDownSLine
                       className="h-5 w-5 text-gray-400"
                       aria-hidden="true"
                     />
                   </span>
                 </Listbox.Button>
                 <Transition
                   as={Fragment}
                   leave="transition ease-in duration-100"
                   leaveFrom="opacity-100"
                   leaveTo="opacity-0"
                 >
                   <Listbox.Options className="absolute mt-1 max-h-60 w-full overflow-auto rounded-md bg-white py-1 text-base shadow-lg ring-1 ring-black ring-opacity-5 focus:outline-none sm:text-sm">
                     {NETWORK_DATA.map((person, personIdx) => (
                       <Listbox.Option
                         key={personIdx}
                         className={({ active }) =>
                           `relative cursor-default select-none py-2 px-4  ${
                             active
                               ? "bg-amber-100 text-amber-900"
                               : "text-gray-900"
                           }`
                         }
                         value={person}
                       >
                         {({ selected }) => (
                           <>
                             <span
                               className={`flex items-center w-full text-left ${
                                 selected ? "font-medium" : "font-normal"
                               }`}
                             >
                               <img
                                 src={person.image}
                                 alt={person.name}
                                 width="34px"
                               />
                               {person.name}
                             </span>
                           </>
                         )}
                       </Listbox.Option>
                     ))}
                   </Listbox.Options>
                 </Transition>
               </div>
             </Listbox>
           </div>
           <div>
             <button
               type="button"
               onClick={isUserConnected ? openWalletDetails : openModal}
               className="rounded-lg bg-black bg-opacity-20 px-4 py-2 text-center text-sm font-medium text-white hover:bg-opacity-30 "
             >
               <p>{getText(isUserConnected)}</p>
             </button>
           </div>
 ...
  </div>
       </div>
     </>
   );
 }
The above code should show this output (a dropdown and a button).
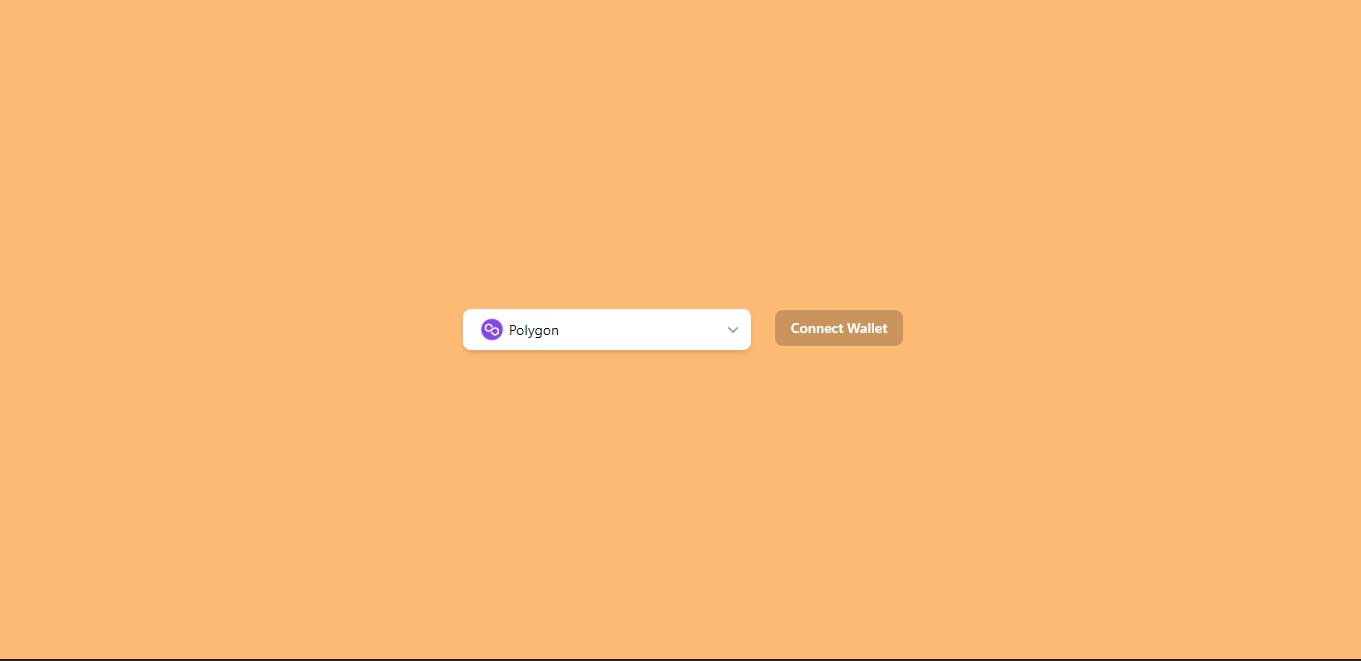
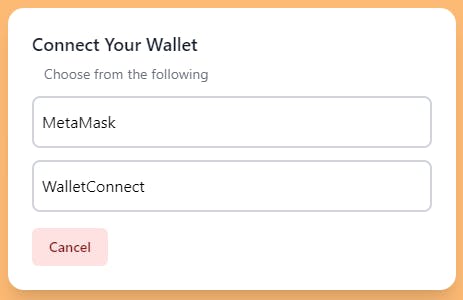
There are 3 modals needed for this application as seen in the GIF result of the application; the select wallets modal, the switch network modal and the wallet details modal.
Select Wallet modal is used to choose between the different wallet connectors (metamask and walletconnect).
 export default function Home() {
 ...
 return (
 ...
 <Transition appear show={isOpen} as={Fragment}>
             <Dialog as="div" className="relative z-10" onClose={closeModal}>
               <div className="fixed inset-0 overflow-y-auto">
                 <div className="flex min-h-full items-center justify-center p-4 text-center">
                   <Dialog.Panel className="w-full max-w-md transform ease-in-out duration-300 overflow-hidden rounded-2xl bg-white p-6 text-left align-middle shadow-xl transition-all">
                     <Dialog.Title
                       as="h3"
                       className="text-lg font-medium leading-6 text-gray-900"
                     >
                       Connect Your Wallet
                     </Dialog.Title>
                     <div className="mt-2 mx-3">
                       <p className="text-sm text-gray-500">
                         Choose from the following
                       </p>
                     </div>
                     {connectors.map((connector, index) => (
                       <div
                         key={index}
                         onClick={() => connect({ connector })}
                         className="border-2 rounded-lg my-3 cursor-pointer border-gray-300 w-full text-black px-2 py-3 hover:bg-gray-200 hover:text-gray-800"
                       >
                         {connector.name}
                       </div>
                     ))}

                     <div className="mt-4">
                       <button
                         type="button"
                         className="inline-flex justify-center rounded-md border border-transparent bg-red-100 px-4 py-2 text-sm font-medium text-red-900 hover:bg-red-200 "
                         onClick={closeModal}
                       >
                         Cancel
                       </button>
                     </div>
                   </Dialog.Panel>
                 </div>
               </div>
             </Dialog>
           </Transition>
 ...
 )
 }
Switch network modal is used to switch from a wrong network to the chosen selected network.

 export default function Home() {
 ...
 return (
 ...
 <Transition appear show={switchOpen} as={Fragment}>
             <Dialog
               as="div"
               className="relative z-10"
               onClose={closeSwitchOpen}
             >
               <div className="fixed inset-0 overflow-y-auto">
                 <div className="flex min-h-full items-center justify-center p-4 text-center">
                   <Dialog.Panel className="w-full max-w-lg transform ease-in-out duration-300 overflow-hidden rounded-2xl bg-white p-6 text-left align-middle shadow-xl transition-all">
                     <Dialog.Title
                       as="h3"
                       className="text-lg font-medium leading-6 mb-3 text-gray-900"
                     >
                       Switch Network
                     </Dialog.Title>
                     <div className="flex items-center justify-between">
                       You need to switch the nework to {currentNetwork.name}
                     </div>
                     <div className=" flex justify-between mt-4">
                       <button
                         type="button"
                         className="inline-flex justify-center rounded-md border border-transparent bg-green-100 px-4 py-2 text-sm font-medium text-green-900 hover:bg-green-200 "
                         onClick={handleSwitchNetwork}
                       >
                         Switch
                       </button>

                       <button
                         type="button"
                         className="inline-flex justify-center rounded-md border border-transparent bg-red-100 px-4 py-2 text-sm font-medium text-red-900 hover:bg-red-200 "
                         onClick={closeSwitchOpen}
                       >
                         Cancel
                       </button>
                     </div>
                   </Dialog.Panel>
                 </div>
               </div>
             </Dialog>
           </Transition>
 ...
 )
 }
Wallet Details Modal is used to a brief details of the connect address, (you can improve on this in your project).
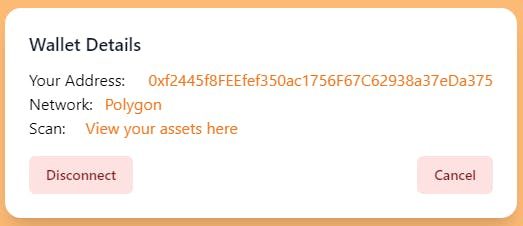
 export default function Home() {
 ...
 return (
 ...
 <Transition appear show={walletDetailsOpen} as={Fragment}>
             <Dialog
               as="div"
               className="relative z-10"
               onClose={closeWalletDetails}
             >
               <div className="fixed inset-0 overflow-y-auto">
                 <div className="flex min-h-full items-center justify-center p-4 text-center">
                   <Dialog.Panel className="w-full max-w-lg transform ease-in-out duration-300 overflow-hidden rounded-2xl bg-white p-6 text-left align-middle shadow-xl transition-all">
                     <Dialog.Title
                       as="h3"
                       className="text-lg font-medium leading-6 mb-3 text-gray-900"
                     >
                       Wallet Details
                     </Dialog.Title>
                     <div className="flex items-center justify-between">
                       Your Address:
                       <span className="text-orange-500"> {address}</span>
                     </div>
                     <div className="flex items-center text-left">
                       Network:
                       <span className="text-orange-500 px-3">
                         {" "}
                         {currentNetwork.name}
                       </span>
                     </div>
                     <div className="flex items-center text-left">
                       Scan:{" "}
                       <a
                         href={`${currentNetwork.blockExplorerUrls[0]}/address/${address}`}
                         target="_blank"
                         className="px-5 text-orange-500"
                       >
                         View your assets here{" "}
                       </a>
                     </div>
                     <div className="flex justify-between mt-4">
                       <button
                         type="button"
                         className="inline-flex justify-center rounded-md border border-transparent bg-red-100 px-4 py-2 text-sm font-medium text-red-900 hover:bg-red-200 "
                         onClick={logout}
                       >
                         Disconnect
                       </button>
                       <button
                         type="button"
                         className="inline-flex justify-center rounded-md border border-transparent bg-red-100 px-4 py-2 text-sm font-medium text-red-900 hover:bg-red-200 "
                         onClick={closeWalletDetails}
                       >
                         Cancel
                       </button>
                     </div>
                   </Dialog.Panel>
                 </div>
               </div>
             </Dialog>
           </Transition>
 ...
 )
 }
Run your application if it's not already running using yarn dev or npm run dev. This would show your full application working, awesome!! 🎉🚀.
You now have a connect wallet app example which can be used in your upcoming web3 projects. Build great and fun stuff 😁.
